Blog 13th June 2026 Acer G246HL Monitor bad capacitors Some years ago I had a pair of LCD monitors on a dual head PC develoment system. I'm guessing I bought them around the mid 90's when LCD was really the only viable display technology and they weren’t bad, arguably not great contrast but pretty good brightness. They worked well enough for me, but I vividly remember feeling very disappointed when after only around 4 years one of them died in an odd way. If the monitor fired up with a display, then it would basically work perfectly. However, if it was left switched off overnight it would persistently refuse to power up on demand the following day. I could often get a display by a seemingly random combination of switching the signal inputs (HDMI and DVI), power cycling and/or trying to get the display menu to pop up. Generally I'd have to try that for some considerable time before it would start. As you'll appreciate, this was a headache and as time went on, it got worse. Right then, I was involved in a punishing development schedule which left the luxuary of downtime a non starter, so I lived with the problem for quite a few months... until, that is, the 2nd monitor began exhibiting the same problem. I reasoned that as the monitor could run after it started, then the majority of the electronics must be reasonably sound. Perhaps there might be a temperature sensitive issue (ie: a component that didn't like running when cold) and so armed with a set of new plastic pry bar tools I carefully removed the back cover. What I saw completely surprised me. As I recall, the PCB has 8 decent sized electrolytic capacitors and every one of them was showing clear signs of over pressurisation. All of them had domed tops and two of the larger, higher voltage capacitors had split open and discharged a brown goo. The back story of all this started with a really sloppy bit of industrial espionage at the tail end of the 90's when a scientist stole an electrolyte formula from a Japanese capacitor manufacturer and sold it to a bunch of other Japanese and Chinese manufacturers more than willing to profit from the fruits of theft. They happily manufactured entire families of electrolytic capacitors - in their millions. The only problem being that the stolen formula was incomplete (or deliberately wrong) in that it lacked the stabilisation chemicals required to ensure water-based electrolytes in electrolytic capacitors don't corrode the aluminium case foil. A great many capacitors manufactured between 1999 and 2010 using this stolen formula generated excess hydrogen gas causing them to bulge and often burst while in some cases leaking a corrosive brown goo and eventually failing. This problem affected virtually every aspect of consumer electronics. I sometimes wonder how many pieces of medical equipment have failed due to this plague of bad parts. The thief made a killing and consumers all paid the price. On both these LCD monitors I ended up replacing all the capacitors... but that gifted me a couple of years of perfect operation before I eventually switched to a pair of higher contrast LED monitors. I use three 21" LED monitors now, two Philips and one much older Acer G246HL dating back to just after the danger time... around 2012 but which in the last couple of months has started to exhibit that same odd power up problem. It got to the point a few days ago where I actually couldn't get it to fire up at all. Wiki Example of Japanese Plague Capacitors
After taking the Acer G246HL monitor to the bench with the display side down, remove the base stand completely. Remove the 4x threaded D type fixing screws along with both black screws on the HDMI port. Then remove the single black screw located at the bottom of the base mount hole (look carefully, as that black screw is a little tricky to spot). Once all five screws are out, the rear half of the enclosure can be separated by carefully using pry bars. I found starting close to a corner gave me a good starting point. Once all the securing clips are free you can pull it away so that the metal frame holding the two main display PCBs is accessible. There is a separate rather delicate strip PCB holding the monitor menu/power (etc) control switches but this can be left to one side when the rear of the enclosure is fully removed. Remove the brass screws fixing the two display PCB's to the metal frame and gently unplug a 5 wire press fit connector with individually coloured wires running to the corner of the LED display panel (ie: it's the only multiwire connector that doesn't use a ribbon cable). At that point, flip the display control PCB's over and you'll be able to see the six electrolytic capacitors - a number of which are mounted on their sides. The largest one looked the worst... ...I didn't mess around, I simply changed them all.
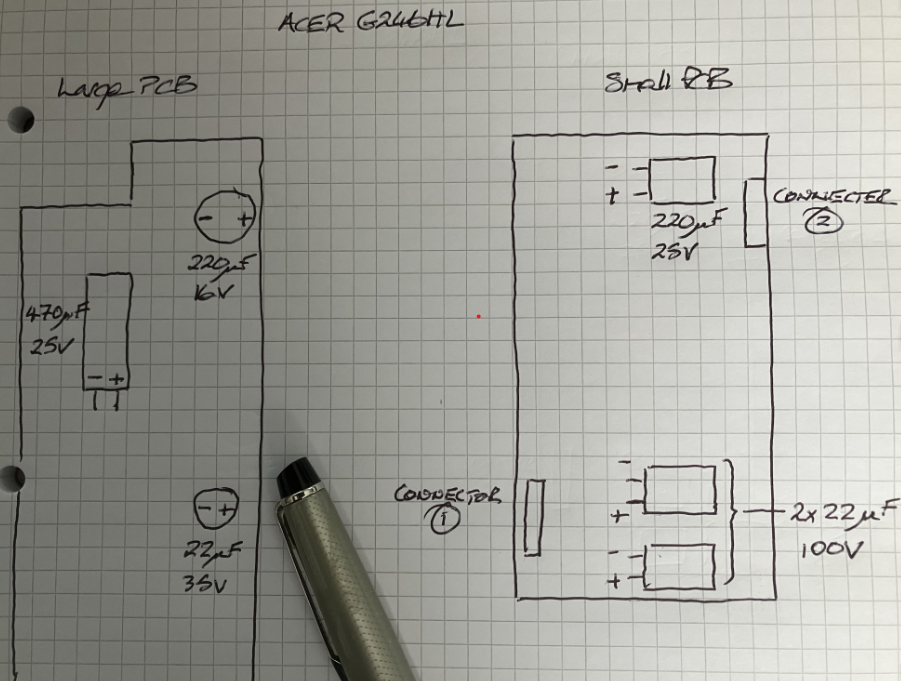
Acer G246HL Electrolytic Capacitor Layout
Replacement G246HL Capacitors From Farnell
I ordered a set (with additional spares) of electrolytic capacitors from Farnell. Ordinary electrolytics with the right capacitance and voltage ratings are fine ie: nothing special is required here but note that electrolytic capacitors are polarised with a -ve and +ve side, so ensure you match the orientation of the replacements exactly as per the originals. Generally the -ve side is marked with a "-" sign. The larger display control PCB uses:-
  • 1x 470uF at 25v
  • 1x 220uF at 16v
  • 1x 22uF at 35v
The smaller display control PCB uses:-
  • 1x 220uF at 25v
  • 2x 22uF at 100v
Farnell are always brilliant both in terms of delivery and availability and their range is phenominal (no, I'm not sponsored... they are simply good at what they do). The parts they shipped were good size matches (two parts were physically smaller than the originals which turned out to be pretty helpful). Replacing them was fairly easy and where possible I reduced the risk of damage to the PCB by cutting the legs of the old parts and soldering the new parts directly to those old legs. Out of the six original parts, two (22uF at 35v and 220uF at 16v) were showing mild doming on the top. However by far the worst capacitor was the 25v 470uF which in all likelihood was the cause of the fault. Ignore the white goop on the case which is merely a type of cauke used to secure the capacitor to the PCB in order to prevent transit damage. Look at the top and note the outward bulged dome. This is the chief characteristic of electrolytic capacitors with this problem. Alas, I have a broken ATX power supply on my bench, manufactured around 2005... and which has a burst capacitor on the PCB. My guess is that it'll be another example of this all too common problem.
Original and damaged 470uF Capacitor
After all the capacitors were replaced, I reassembled the PCBs into their frame and reconnected the multiway plug. I then fitted the back cover and all the securing screws followed by the base. After applying power, it fired up immediately and has just passed its first 24 hour soak test. I left it powered off for 5 hours and again it immediately powered up when switched on - so it looks like the problem is nicely resolved. Comment | Back to Quick Links...